Tuesday, 14 January 2014
20 miles of ribbon in a church
A saw this picture via a friend on Facebook last week and it is the most fabulous art installation in a cathedral in San Francisco by artist Anne Patterson, It is called "Graced with Light" and there is a an article on it HERE.
This is such an inspiring, beautiful event that brought colour, creativity and a spiritual experience together in the cathedral. Love it!
Tuesday, 3 December 2013
Our Christmas banner 2013
![]() |
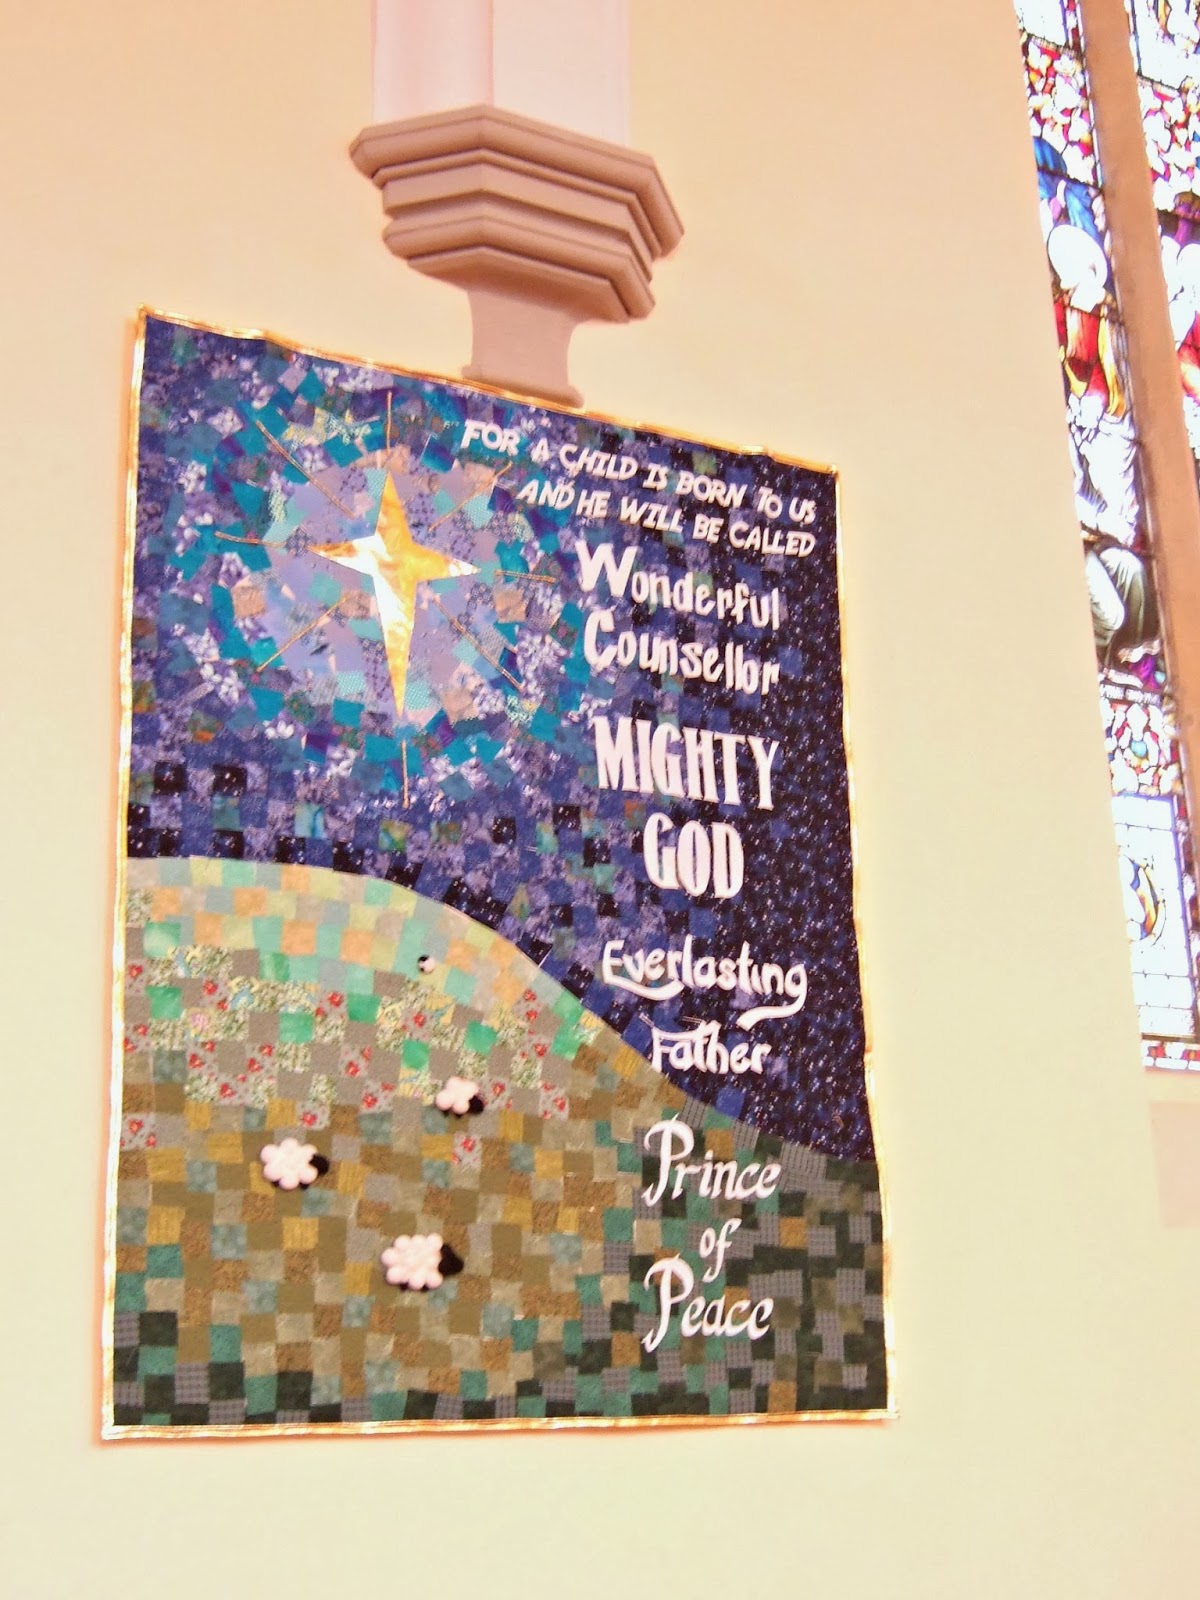
Here is our craft group's finished Christmas banner. We had lots of lovely comments from members of the church on Sunday and everyone in the group is really pleased with how it's turned out.
The background is made of 2" squares of blue and green fabrics with Bondaweb on the back of each one and then ironed in place. We used a LOT of Bondaweb!
The star is made from gold fabric which was also used to bind the edges of the banner and looks very festive. As we are beginners to making banners there are lessons learned from every one we make. This time I could have used much thicker gold cord as the star's rays.
Wednesday, 23 October 2013
A Christmas banner design - with added sheep
Our Create group has started working on a banner to hang in the church over Christmas. We have a fun project going on at the moment where lots of people in the church have knitted sheep (there are 30) all from the same pattern. 24 sheep will be hidden around our town in the style of a treasure hunt and 6 will be in various churches. This is all happening around Christmas to encourage people to think about coming to church to celebrate Christmas.
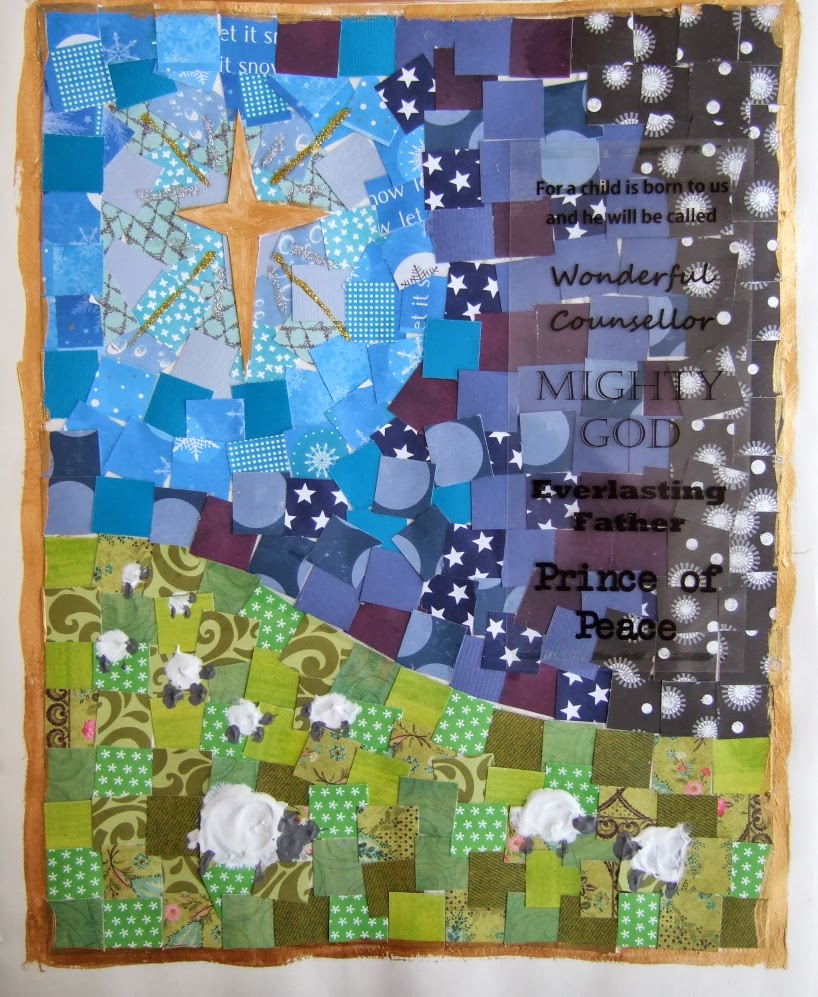
I wanted to continue the sheep theme on our Christmas banner. This is the page in my sketchbook that I put together to show the members of the group what we are working towards. Using lots of squares of fabric to create the background is a great way to use up my fabric (I have quite a lot!).
The words on the actual banner will be in white not black.
I made the sheep using moulding paste and paint. The sheep on the finished banner will be made from felt pebbles.
I wanted to continue the sheep theme on our Christmas banner. This is the page in my sketchbook that I put together to show the members of the group what we are working towards. Using lots of squares of fabric to create the background is a great way to use up my fabric (I have quite a lot!).
The words on the actual banner will be in white not black.
I made the sheep using moulding paste and paint. The sheep on the finished banner will be made from felt pebbles.
Wednesday, 16 October 2013
My Friend - Wonder Woman!
I'm back! I am hoping to be blogging a lot more here now. I am entering a new stage in my life as my youngest child has just started school and it's a big adjustment. The photo above is of my lovely friend Claire and she has recently featured on The Salvation Army website in New Zealand. Here's the article. It gave me food for thought. I love Claire's phrase "holding things lightly". As I work out which way my artwork is going, in terms of work and church commitments, I am going to be giving serious thought as to what I will be holding onto lightly.
I have started a new creative group at church, called "Create". We will be meeting once a month and we will be working on church banners alongside anyone who wants to come along and bring along their own craft projects. I am hoping it will develop into a group that encourages, friendship, encouragement and inspiration (and some cake too!). We had our first meeting last night and we've made a start on our Christmas banner. It was a fun evening of chatting and cutting out fabric squares.
Sunday, 11 August 2013
Creation story - a kids banner
I was helping out at Sunday school a couple of months ago and we were looking at the beginning of Genesis and my friend asked if we could make some kind of mural/banner to go in the room at the back of the church. This is where there are a selection of toys for younger children to play with during the service and we thought it could do with a bit of brightening up.
I knew instantly what to do as I have been looking at this "make your own wall hanging" from Baker Ross for a while. The pack comes with 32 fabric squares which are ready hemmed and have holes cut in each corner. The pack also includes lots of brightly coloured ribbons to tie the squares together. I assembled lots of fabrics and cut out some squares as backgrounds and then used Bondaweb to trace and cut out some silhouettes of plants/flowers/fish/animals etc. I took the squares along to Sunday school and the kids (aged 4-7) added lots of details to the squares using fabric felt tip pens.
When I got the squares home I used fabric paint and foam stamps for the larger letters and StazOn ink with clear acrylic stamps for the smaller lettering. I based the words on The Message translastion of Genesis. I also used Bondaweb to iron on some thick calico backing onto the squares as the original fabric is quite thin and I wanted the finished banner to be quite robust.
I stitched on buttons and charms to the squares too.
We had fun hanging it up. We aren't allowed to drill holes into the walls without special permission but luckily there were two existing hooks. The hooks are very, very high above a window. A friend and I scaled the ladder to hang two chains from the hooks which came down to below the window and then a curtain pole was hung from the chains. It's nearly straight too!
We've had lots of great comments about how well it's turned out and the kids are very proud of their handiwork.
Labels:
banners
Tuesday, 29 January 2013
Romans 12 v 12 (and a PVA fabric resist)
We had a Women's Day at our church this weekend and the verse from Romans 12 v 12 was used on the day with the theme of Hope. The day went really well with over 130 people coming along to it.
I had fun making the banner as I tried out a new resist technique. I started with a white piece of fabric and then I painted the large words using a cheap kids PVA glue (labelled "washable") and let it dry completely. I pinned the fabric up on the wall and projected the words on to it so that they would be neat, but I stuck bin bags to the wall behind the fabric as I was worried I would glue the whole thing to the wall!
The next step was to cover the banner in fabric paint, and I was really pleased with how it turned out as it reminded me a little of a Kandinsky painting. I painted some white fabric paint onto some bubble wrap and printed some circles with it.
When the paint was dry I gave it a quick iron and then left it to soak in tepid water in the bath for half an hour and then scrubbed off the PVA glue. I was so happy when I saw it had actually worked! Then I washed and dried it in the washing machine / tumble drier.
I had some members from my banner team come round to my house and help cut out the black letters which we ironed on and then I pinned it together with very heavy calico on the back to give it some weight so it will hang nicely. I then stitched around the white circles - I love how this looks, even though you can't really see it in the church setting.
I bound the edges with red fabric and had some help hanging it up in church (It's up so high!).
I've had some lovely comments back from church already and so now my thoughts are turning to a design for Easter which we can work on as a group.
Sunday, 9 December 2012
Canvas Commisions
I go to a Toddler group every week with my little boy and for the past year we have been meeting in a different place while our church underwent major renovation work. The Clevedon Family Church welcomed our group in and let us share their lovely space. This week was our last week there before moving back to the newly refurbished church and I was asked to make two canvases as thank you presents. One for the church and one for the lovely lady who has been helping us every week.
This first canvas was the one I made for the church. It's a little bigger than A4 size. My stamping is a bit wobbly but I'm happy with how it turned out.
I started by sticking down pieces of patterned paper onto the canvas. You can see some of the paper showing through the paint here...
I dug out some old alphabet stickers and wrote out the words "love" and "thanks" repeating across the canvas, which I gessoed so they would disappear into the paint.
I then painted and stamped to finish the design, using a variety of stamps so that the Bible verse would fit in. I also discovered when I came to stamping out the numbers - I hardly have any number stamps!
This next canvas was for the lady who helped us every week. My friend tipped me off that this was a verse she liked.
I then painted and stamped to finish the design, using a variety of stamps so that the Bible verse would fit in. I also discovered when I came to stamping out the numbers - I hardly have any number stamps!
This next canvas was for the lady who helped us every week. My friend tipped me off that this was a verse she liked.
Tuesday, 6 November 2012
Praise God from whom all blessings flow - a banner
Wow, it been ages since I've written on here. Life has been so busy with the daily challenges of family life and lots of crafting added in too. The exciting news is that I have finished my first banner - yay! Our church moved back into our newly renovated building on Sunday and it was such an exciting day. It's a fantastic place which can be used by so many people in our community now. It's such an opportunity to bless others.
So, here's my banner. It was running around in my head for ages and it finally came together on fabric last week. I've had lots of lovely comments already from friends at church.
It started out as a patchwork of different fabrics which I ironed onto a backing piece of calico using Bondaweb. I bought a complete roll of Bondaweb before I started - 30m should keep me going for a while.
I did some free-motion stitching around some of the squares as I didn't completely trust the Bondaweb and had images of the whole thing peeling away from the backing cloth half way though a service. The stitching is completely invisible once you take two steps back from the banner, which is something to bear in mind for future projects.
I projected a line drawing of the church onto the banner and drew around it with a pencil before painting over the lines using brown fabric paint and a fairly thick paintbrush. I drew around a few of the kids at Sunday school and cut out the paper to make stencils. I used some spray inks from my scrapbooking stash to make the silhouettes (with varying success - Maya Mist doesn't seem to like fabric much).
The letters were traced onto Bondaweb (reversed) and then ironed onto black fabric before being cut out.
There is a backing of very heavy calico behind the banner to give it weight so it would hang nicely and then the edges were bound with red fabric.
I now have a team of 7 people to help me with the next banners, which are going to be Christmassy and (hopefully) quite sparkly.
Here's how our church looks now...
Labels:
banners
Wednesday, 16 May 2012
And his banner over me is love
I finished this canvas a few weeks ago for a prayer day at church. My friend Kate had an idea for a banner of writing this verse from Song of Songs over the top of a background of lots of Bible verses about God's love. I made the background using my Junior Dymo embossing label maker and a big bag of tapes I've had for ages. I spent three evenings clicking away to type out enough strips to completely cover the canvas.
I made a stencil from scrap paper in the heart shape and finger painted to add the heart, then rubbed paint around the edges of the canvas too. I really like finger painting at the moment!
I stamped white paint on the bubble wrap and used multi medium to image transfer some book text and some birds I found in an old book.
I added pieces of patterned tissue paper and strips of microporous tape. For the main text on the heart, I just went for it with a permanent marker and wrote the words on. I practised using the stencil to check where the words would go and how big to make them, but then I just wrote it on and hoped for the best.
I gave Kate the canvas after the prayer day (as it was her idea which sparked it) and she loved it. I'm now trying to work out how I could translate it into a larger banner (maybe using foam alphabet stamps and some kind of resist technique?).
Monday, 5 March 2012
Psalm 139 canvases

I have finally completed some of my own artwork - hurray! It was my scrapbooking group's day to meet up at the weekend but I didn't feel in a scrapbooking mood. I picked up a pack of three blank canvases and a selection of materials and headed out to spend the day with my creative friends. I was so pleased to have completed this series in one day. I've had the idea in my head for while and I often find that when I've been considering a piece of art for a while it can come together fairly quickly.
I decided to go for it with these canvases partly because we have a 12 hour prayer day coming up at church and a friend asked if she could borrow some artwork to decorate the space. The piece we used in the past is (finally) screwed to the wall in my kitchen so it was a good motive to create some new pieces.
The three canvases are all based on Psalm 139. This psalm was read at our wedding, and has been important to me at lots of different times.
Psalm 139 v 5 "You hem me in behind and before
You have laid your hand upon me"

I found some ledger type paper and some text paper that looks like an ancient law which I used in the background. My bible explains the verse "hem me in" as "to keep under scrutiny" and so i thought those papers represented that.

For me, knowing God hems me in is about freedom to live fully, so I included a travel ticket and a bicycle advert.

Frames seemed an obvious choice about being hemmed in, but I also think these rub-ons are pretty. There are aesthetic choices made here too.
if I settle on the far side of the sea,
even there your hand will guide me,
your right hand will hold me fast".

Here is an old map page under the painting of the bird's wings.
your works are wonderful, I know that full well.

In a pile of old papers I found a girls notebook from working in a laundry at the turn of the 20th century. In the back of the book is a prayer written in her handwriting. This canvas is about identity and handwriting is such a unique, personal trait, just like a fingerprint.
One of my favourite Christian bands were called Eden Burning and they wrote a couple of songs which I have found myself humming while working on these canvases, "Hem Me In" and "If I Go Up"
Labels:
artwork
Thursday, 1 March 2012
A little overwhelmed
Life here is busy busy busy! It is always going to be busy with three young children and a husband working hard and I have also had some exciting work opportunities come up writing for two craft magazines (Scrap365 and Sewing World). My artwork based on my faith has been pushed into the back of my head, but it keeps on popping up into my imagination every now and again.
The building work at our church is going well and moving into the finished building in September doesn't seem so far away now. You can see pictures of the progress here. I need to get some banners made, but first they need to be designed - I'm not even sure how big they are supposed to be yet? Then I have to organise a group of busy people to be available at the same time to work together on the project.
I have been fortunate to get back in touch with friends who are now working as artists, particularly Sheona Beaumont and Heidi Hinder. Their work is so amazing and it totally inspires me.
But now I have doubts in my head. What if I get it wrong? What if I run out of time? What if people don't like the banners? I know my artistic skills don't compare with others, but maybe it's about relying on God. I can't do this in my own strength so I will have to rely on Him. I have been trying to focus and concentrating on reading my Bible every day. I have also signed up for an online class called "Scrapbooking your Faith" which starts today. I am starting in a place I know (cutting and sticking!) and I hope to move forward from there.
Thank you for sharing my rambling. I look forward to sharing some artwork from the upcoming classes soon too.
Sunday, 12 February 2012
A textured banner
This is a banner by Linda Albrecht which was featured on the Maya Road Design Team blog recently. I love all the little details on this. You can see it in more detail here.
Thursday, 9 February 2012
Light of the World
On Sunday a lady in our church leaned forward and tapped me on the shoulder. She handed me a little booklet with this picture on the front and said she felt like she was meant to give it to me. She told me her mother had a picture of it, so she always thinks of mothers with this image and saw me with my three children running around and thought I would like it. I do like it and I found it so inspiring reading about it in the booklet. This lady didn't know about my exploration of church art and so I thanked her and later explained how inspiring it had been for me.This picture is called "Light of the World" by William Holman Hunt and was painted in 1853-1854, who was part of the Pre-Raphaelite movement. It's a really famous image and yet I haven't encountered it before. It continues to inspire so many people with all it hidden messages which were so popular with the Pre-Raphaelites. There is a great explanation of it here.
One of the reasons I found this so inspiring is the perspective of time, that an artist created something which is continuing to inspire over 150 years later and is being shared online too all over the world, which Holman Hunt could never have dreamed of.
Labels:
inspiration
Sunday, 22 January 2012
Sheona Beaumont
I've recently got back in touch with my friend Sheona Beaumont. We went to a church youth group together when we were teenagers. Her artwork is completely amazing. She works with photography and digitally alters images to make astounding pieces. 
Sheona has a degree in Fine Art and a Masters in Visual Culture and is currently completing her PhD - Wow! Sheona's work humbles and challenges me.
Her banners below from her Hope Soars exhibition are so beautiful. Check out more of her work in her gallery.
Sheona has two exhibitions coming up. She has a charity exhibtion at Paintworks in Bristol on the 14th-18th February 2012. Hope//Poverty is an exhibtion to raise money for Mercy In Action who work with street children in the Philippines. It will include work from her Hope series.Sheona also has new pieces to exhibit in May 2012 as part of the Bristol Festival of Photography .
Wednesday, 11 January 2012
The Art of Wild Abandonment

I am slowly emerging from the hectic Christmas holidays and planning for the year ahead. The house has been tidied (almost) and the calendar is filling up with holiday plans and work commitments.
I haven't taken part in an online workshop for a while and the new year has brought some exciting opportunities with some great teachers. The first class I've signed up for starts on March 12th and it's called "The Art of Wild Abandonment". It's a class run by Christy Tomlinson and Junelle Jacobsen. It's a three week course, but it will be open for a year, so it will give me plenty of time to really get into the teaching material.
Junelle's fabulous work is shown in the top picture and below. Her blog is fabulous and her expression of her faith is so inspiring.

Here are a couple of canvases by Christy. I've been following Christy's blog for a while and enjoyed a few of her classes. I love her methods behind her artwork and the art journalling course I took with her has changed how I approach my own work in a major way. She chats about her faith so easily alongside her craft chats.
Subscribe to:
Posts (Atom)